Creating graphics for the web is a tough job. Not only do you need to consider the colors you use and the quality of compressed images but you have to make images fit the design, adjust colors to mach the exact background color, keep strict control of the file size and last but certainly not least; cut them as small as possible.
 Normally
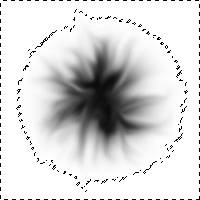
this won't pose any problems but sometimes you'll be using images which have blurry
borders, an example of which is the big logo on the home page of this site. Cropping a
picture like this is rather difficult; cropping it too large will increase the file size,
cropping it too small might show up artifacts when used on your site. Here I'll
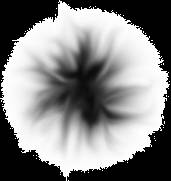
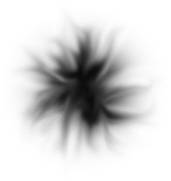
demonstrate a way to crop images like the one displayed here just right. Should you care
to know, the image was made using a simple soft brush dot and smearing it in and out with
a smaller soft brush.
Normally
this won't pose any problems but sometimes you'll be using images which have blurry
borders, an example of which is the big logo on the home page of this site. Cropping a
picture like this is rather difficult; cropping it too large will increase the file size,
cropping it too small might show up artifacts when used on your site. Here I'll
demonstrate a way to crop images like the one displayed here just right. Should you care
to know, the image was made using a simple soft brush dot and smearing it in and out with
a smaller soft brush.
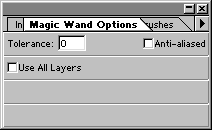 We're gonna select all the surrounding white space. To do this will use the
Magic Wand with some custom options. We need to select only the pixels that are not part
of the actual image thus we set both the Tolerance and the Anti-alias off, if you're image
is split over several layers make sure to switch the "Use All Layers" checkbox
on. In programs other than PhotoShop you may find the same functionality hidden under some
other tool.
We're gonna select all the surrounding white space. To do this will use the
Magic Wand with some custom options. We need to select only the pixels that are not part
of the actual image thus we set both the Tolerance and the Anti-alias off, if you're image
is split over several layers make sure to switch the "Use All Layers" checkbox
on. In programs other than PhotoShop you may find the same functionality hidden under some
other tool.
 Now just select any pixel which is known to not be part of the actual image and
a selection will be made of all the pixels at the surrounding it. In PhotoShop you can use
the Shift key to select multiple parts if this should be necessary.
Now just select any pixel which is known to not be part of the actual image and
a selection will be made of all the pixels at the surrounding it. In PhotoShop you can use
the Shift key to select multiple parts if this should be necessary.
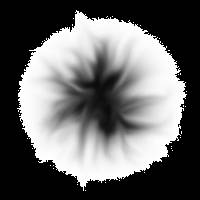 The next stage is to add a new layer to the image and fill it up with a
contrasting color. In our example project we will use black, naturally.
The next stage is to add a new layer to the image and fill it up with a
contrasting color. In our example project we will use black, naturally.
If your graphics program does not have a Magic Wand like tool for selecting pixels you can also duplicate the layer your working on and try a normal fill tool. This will work in PhotoShop and other graphics applications as well, but you'll have to flatten all layers containing parts of the image first.
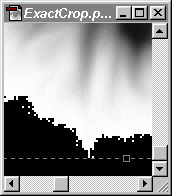 Now get into the zoom mode (unless you've got really good eyes) and place the
Crop box anywhere. In zoom mode you can now drag the box to touch the edges of the image
which are now clearly visible. If your graphics program cannot crop this way you could
also use the crop tools for that application, at the very least you can now get accurate
coordinates of what needs to be cut.
Now get into the zoom mode (unless you've got really good eyes) and place the
Crop box anywhere. In zoom mode you can now drag the box to touch the edges of the image
which are now clearly visible. If your graphics program cannot crop this way you could
also use the crop tools for that application, at the very least you can now get accurate
coordinates of what needs to be cut.
 After
cropping is done you'll end up with an image which still has the black layer so,
logically, you just remove the layer and arrive at the final image. If you used a normal
fill to mark the borders you can just fill these parts again with the original color but
be sure to check the edges of the picture, it's likely there are still areas which need to
be filled.
After
cropping is done you'll end up with an image which still has the black layer so,
logically, you just remove the layer and arrive at the final image. If you used a normal
fill to mark the borders you can just fill these parts again with the original color but
be sure to check the edges of the picture, it's likely there are still areas which need to
be filled.
 If
you want you're final image to be smaller you can set the tolerance of the Magic Wand
somewhat higher, although this will result in cropping parts of the actual image, at least
you'll be sure that it happens at an equal rate over the whole image.
If
you want you're final image to be smaller you can set the tolerance of the Magic Wand
somewhat higher, although this will result in cropping parts of the actual image, at least
you'll be sure that it happens at an equal rate over the whole image.
Also note that you could use the selected area as a transparency layer if you're going to save the image as a GIF.